
Creating a welcoming atmosphere at home often begins with scent. Reed diffusers are a simple, elegant way to infuse your space with fragrance without the need for flames or electricity. They work by drawing scented liquid up through porous wooden sticks, releasing the aroma gradually into the air. Making your own reed diffusers at home is not only cost-effective but also allows you to customize scents to suit your mood, season, or occasion.
Why Make Your Own?
- Customization: You control the fragrance blend, strength, and style.
- Cost Savings: Homemade diffusers are far less expensive than store-bought versions.
- Eco-Friendly: You can reuse jars, bottles, and sticks, reducing waste.
- Aesthetic Appeal: DIY diffusers can be tailored to match your décor, adding both scent and style.
Ingredients and Materials
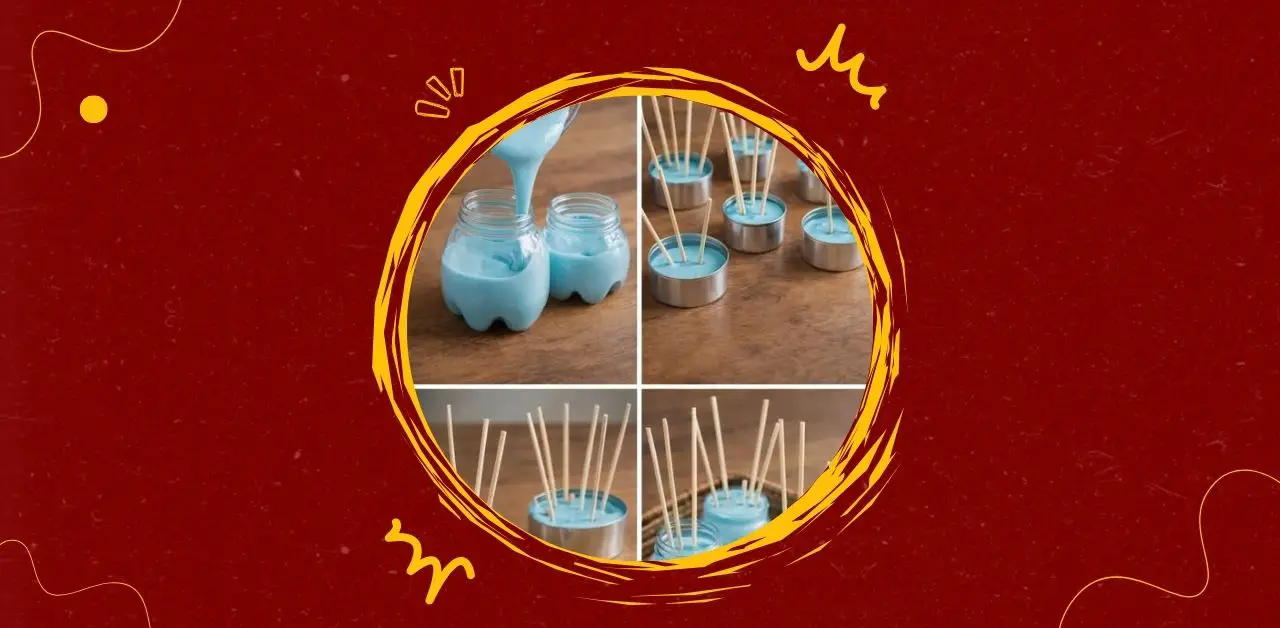
- Small glass jars or bottles (with narrow openings to slow evaporation)
- Reed sticks (bamboo skewers or rattan sticks work well)
- ½ cup carrier liquid (options: unscented baby oil, fractionated coconut oil, or a mix of water and alcohol)
- 20–30 drops of essential oils (lavender, citrus, eucalyptus, vanilla, etc.)
- 1 tablespoon of vodka or rubbing alcohol (helps thin the oil and carry the scent)
- Decorative items (optional: ribbons, shells, or baskets for presentation)
Instructions
- Prepare the Base: Pour the carrier liquid into your chosen jar or bottle. This acts as the medium that will hold and transport the fragrance.
- Add Essential Oils: Choose one or more essential oils depending on the mood you want to create. For relaxation, lavender and chamomile are excellent. For freshness, citrus oils like lemon or orange work beautifully. Add 20–30 drops to the base liquid.
- Mix Thoroughly: Stir or swirl the liquid to ensure the oils are evenly distributed.
- Insert Alcohol: Add a tablespoon of vodka or rubbing alcohol. This thins the mixture, allowing it to travel more easily up the reeds.
- Place the Reeds: Insert 5–7 reed sticks into the jar. After a few hours, flip them to saturate both ends.
- Arrange and Decorate: Place the diffuser in a central location. For added charm, arrange jars in baskets with decorative shells or flowers.
- Maintenance: Flip the reeds every few days to refresh the scent. Replace the liquid and reeds every 3–4 weeks for best results.
Servings
This recipe makes one diffuser jar, but you can easily scale up to create multiple jars for different rooms.
Note
Homemade reed diffusers are intended as a lifestyle and wellness practice, not a medical solution. Essential oils should be handled with care—some may cause irritation if touched directly or used excessively. Always keep diffusers out of reach of children and pets.
The true value of this project lies in its combination of creativity and mindfulness. Selecting oils, mixing them into a base, and arranging reeds becomes a ritual that encourages you to pause and engage with your senses. Over time, this practice can foster a deeper appreciation for natural fragrance and the calming effect it brings to your environment.
This is not about quick fixes but about embracing a gentle, supportive routine in your home. Think of it as a way to honor your space each day, offering freshness, beauty, and comfort while setting a positive tone. A DIY reed diffuser is more than just a fragrance—it is a mindful practice that encourages balance, calm, and delight, helping you create a home that feels welcoming and cared for.