
Crispy Buttermilk Fried Chicken Drumsticks are a timeless indulgence—golden, crunchy on the outside, and juicy on the inside. This recipe transforms simple chicken legs into a flavorful, crowd-pleasing dish using a classic technique: marinating in buttermilk, coating in seasoned flour, and frying to perfection. The result is a drumstick with a shatteringly crisp crust and tender meat that pulls cleanly from the bone.
The secret lies in the buttermilk soak, which tenderizes the chicken and infuses it with subtle tang. The seasoned flour blend adds layers of flavor and texture, while the frying process locks in moisture and creates a rich, golden exterior. Whether served hot with dipping sauces or cold for picnics, these drumsticks deliver satisfaction in every bite.
This recipe is ideal for family dinners, weekend gatherings, or festive occasions. It’s easy to scale, forgiving for beginners, and endlessly customizable with spices and herbs. With a few simple steps and attention to detail, you can create fried chicken that rivals any restaurant version—crispy, juicy, and irresistibly good.
INGREDIENTS:
For the marinade:
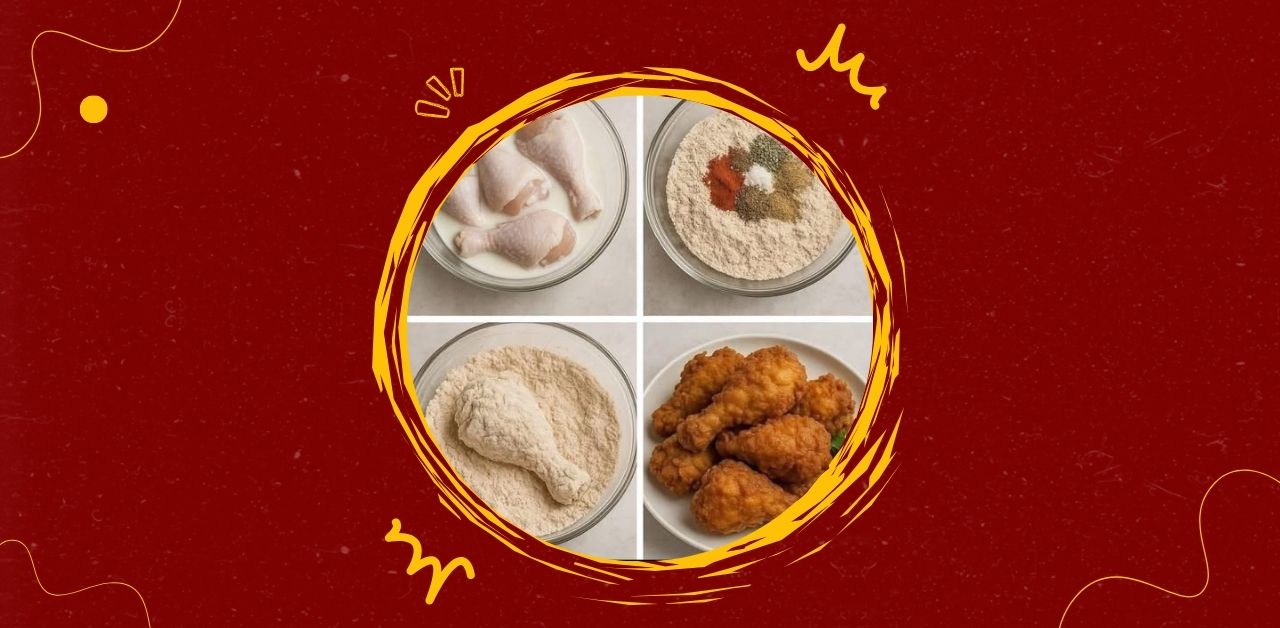
- 8 chicken drumsticks (skin-on, bone-in)
- 2 cups buttermilk (or 1 ¾ cups milk + 2 tablespoons vinegar or lemon juice)
- 1 teaspoon salt
- 1 teaspoon black pepper
- 1 teaspoon paprika
- 1/2 teaspoon garlic powder
- 1/2 teaspoon onion powder
For the seasoned flour coating:
- 2 cups all-purpose flour
- 1 teaspoon salt
- 1 teaspoon black pepper
- 1 teaspoon paprika
- 1/2 teaspoon cayenne pepper (optional, for heat)
- 1/2 teaspoon white pepper
- 1/2 teaspoon garlic powder
- 1/2 teaspoon onion powder
- 1/2 teaspoon dried thyme or oregano (optional)
For frying:
- Vegetable oil (canola, sunflower, or peanut oil) for deep frying
- Heavy-bottomed pan or deep fryer
- Tongs or slotted spoon
- Wire rack or paper towels for draining
INSTRUCTION:
Step 1: Marinate the chicken
- Rinse and pat dry the drumsticks. Trim excess skin or fat if desired.
- In a large bowl, combine buttermilk, salt, pepper, paprika, garlic powder, and onion powder.
- Add drumsticks to the bowl, ensuring they are fully submerged.
- Cover and refrigerate for at least 4 hours, preferably overnight. This tenderizes the meat and enhances flavor.
Step 2: Prepare the seasoned flour
- In a separate bowl, mix flour with all the listed spices and herbs.
- Stir thoroughly to distribute seasoning evenly.
- Set aside for coating after marination.
Step 3: Coat the chicken
- Remove drumsticks from the marinade, letting excess buttermilk drip off.
- Dredge each drumstick in the seasoned flour, pressing firmly to ensure a thick, even coating.
- For extra crunch, dip coated drumsticks back into buttermilk and re-dredge in flour.
- Place coated drumsticks on a tray and let rest for 15–20 minutes. This helps the coating adhere during frying.
Step 4: Fry the chicken
- Pour oil into a deep pan, filling about 2–3 inches deep. Heat to 325–350°F (165–175°C).
- Carefully lower drumsticks into the hot oil using tongs. Do not overcrowd the pan—fry in batches.
- Fry each drumstick for 10–12 minutes, turning occasionally for even browning.
- Use a meat thermometer to check internal temperature—it should reach 165°F (74°C).
- Once golden and crisp, remove drumsticks and place on a wire rack or paper towels to drain excess oil.
- Let rest for 5 minutes before serving to allow juices to settle.
SERVINGS:
This recipe yields 8 drumsticks, suitable for 4 servings (2 drumsticks per person). For larger gatherings, double or triple the recipe and fry in batches.
NOTE:
Marinade Tips
- Buttermilk substitute: Mix milk with vinegar or lemon juice and let sit for 10 minutes.
- Flavor boost: Add hot sauce or mustard to the marinade for extra zing.
- Marination time: Longer marination (up to 24 hours) results in more tender and flavorful chicken.
Coating Tips
- Double dredge: For extra crunch, dip in buttermilk and flour twice.
- Flour blend: Adjust spices to taste—add more cayenne for heat or herbs for aroma.
- Texture: Press flour firmly onto chicken to create a thick crust.
Frying Tips
- Oil temperature: Use a thermometer to maintain consistent heat. Too hot burns the coating; too cool makes it greasy.
- Pan choice: Use a heavy-bottomed pan for even heat distribution.
- Safety: Keep a lid nearby and never leave hot oil unattended.
- Drain properly: Use a wire rack to prevent sogginess. Paper towels can trap steam.
Serving Suggestions
- With sides: Pair with coleslaw, mashed potatoes, cornbread, or pickles.
- With dips: Serve with honey mustard, spicy mayo, ranch, or garlic sauce.
- For brunch: Add waffles and syrup for a sweet-savory twist.
- For picnics: Cool and pack in airtight containers. Tastes great cold too.
Storage and Reheating
- Refrigeration: Store leftovers in an airtight container for up to 3 days.
- Reheating: Warm in oven at 350°F for 10–15 minutes. Avoid microwaving—it softens the crust.
- Freezing: Freeze cooked drumsticks individually wrapped. Reheat from frozen in oven.
Customization Ideas
- Spice blends: Try Cajun, peri-peri, or curry powder in the flour mix.
- Herb infusion: Add rosemary or sage to the oil while frying for aromatic flavor.
- Crunch boosters: Mix cornmeal or panko into the flour for added texture.
- Gluten-free: Use rice flour or chickpea flour for coating.
- Egg wash: For a richer crust, dip in beaten egg before flour dredging.
Practical Tips
- Batch prep: Marinate and coat chicken ahead of time. Fry just before serving.
- Crowd control: Keep fried drumsticks warm in a low oven (200°F) until ready to serve.
- Presentation: Garnish with parsley, lemon wedges, or chili flakes for visual appeal.
- Flavor layering: Season both marinade and flour for depth. Don’t rely on one step alone.
- Cooking rhythm: Fry in small batches, rest between rounds, and enjoy the process.
Mindful Cooking
- Sensory cues: Listen for sizzling, watch for golden color, and smell the aroma to guide frying.
- Relaxation: Cooking fried chicken can be therapeutic—focus on each step and enjoy the transformation.
- Sharing joy: Fried chicken is a communal dish—serve with love and laughter.
- Creative expression: Customize spices, dips, and sides to reflect your style.
- Seasonal twist: Add citrus zest in summer or warming spices in winter.
- Cultural connection: Fried chicken is beloved worldwide—celebrate its heritage and versatility.